Mac and Cheese Meal Prep: Juicy Chicken, Pasta and Balanced Flavor
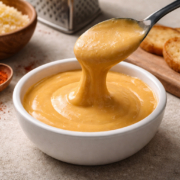
Cheese sauce meal prep is part of one of the most loved comfort foods – mac and cheese, but it is often seen as something too high in fat and calories. Many people immediately associate cheese sauce with pasta and classic mac and cheese, a dish that is often considered unsuitable for everyday meals. In reality, the problem is not the cheese sauce itself — it’s how the sauce is built and which ingredients are used.
When prepared intelligently, cheese sauce can become a key component of an affordable and well-balanced meal prep, combining great taste, practicality, and nutritional balance.
How to Create a Cheese Sauce That Works for Meal Prep?
A mac and cheese–style sauce designed for meal prep needs to meet different criteria than a traditional restaurant-style sauce. It should not be overly fatty, as that quickly makes the dish heavy and tiring to eat. At the same time, it must not sacrifice flavor — taste is what makes a meal worth repeating.
A meal prep–friendly cheese sauce is built around higher-protein ingredients, which help improve satiety and overall nutritional value. Using lower-fat cheese allows calories to stay under control without making the sauce watery or bland. The right texture comes from balance, not from excessive cream or butter.
Seasoning also plays a crucial role. Well-chosen spices and flavor accents help bring out the natural richness of the cheese, ensuring the sauce remains full-bodied and satisfying even with less fat. This is why a healthier cheese sauce does not have to fall short in taste compared to the classic version.
Just as importantly, a cheese sauce for meal prep must store and reheat well. A properly made cheese sauce:
- keeps well in the fridge for several days
- reheats evenly
- does not split, dry out, or turn grainy
That’s why this type of cheese sauce works perfectly with juicy chicken breast, pasta, and vegetables, creating a practical and balanced meal for the entire week.
Juicy Chicken Breast as a High-Protein Base
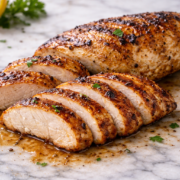
Juicy chicken breast that’s easy to prepare and perfect for meal prep.
Why Juicy Chicken Breast Is Ideal for Meal Prep?
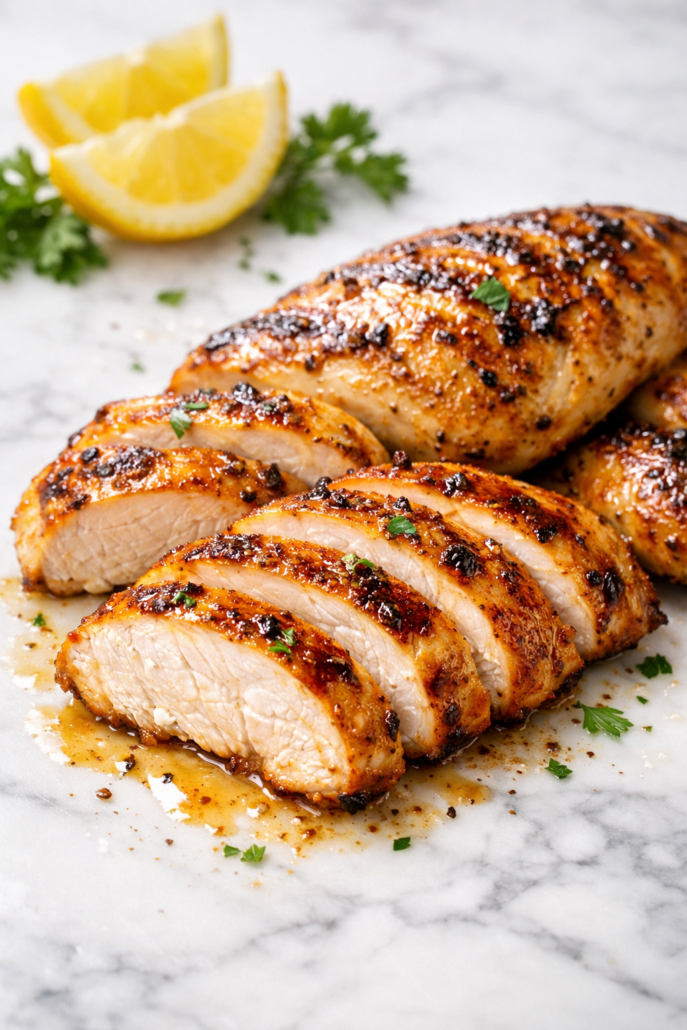
The first recipe in this series focuses on juicy chicken breast, which forms the protein-rich foundation of the entire dish – I usually buy chicken fillet in bulk from Lidl — the price is simply too good to beat. In meal prep, chicken quality is especially important – dry chicken can ruin the whole meal and quickly make it unappealing. In addition to this chicken breast recipe, I also have an excellent KEFIR-MARINATED CHICKEN BREAST recipe.
Properly prepared juicy chicken breast:
- stays tender even the next day
- absorbs the flavors of the cheese sauce well
- provides a high-quality protein source
Thanks to juicy chicken breast, the cheese sauce becomes a supporting flavor element rather than the main source of calories. I prepare my chicken using a salt-based dry brine method, which helps keep the meat exceptionally juicy, soft, and richly flavored.
What Is Dry Brine and Why Does It Make Chicken Extra Juicy?
Dry brine is a technique where meat is seasoned with salt and dry spices without using any liquid and then left to rest before cooking. It’s a widely used method in professional kitchens because it consistently delivers juicy, flavorful results.
A dry brine made with salt and dried herbs enhances both the taste and texture of chicken, making it noticeably more tender and moist.
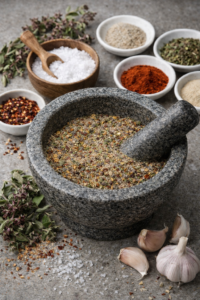
Soolast ja kuivatatud ürtidest koosnev kuivsoolamise segu annab kanale eriti hea maitse ja mahlase tekstuuri.
How Dry Brine Actually Works
- Salt First Draws Moisture to the Surface
- When you rub chicken with salt, it initially pulls natural moisture out of the meat. This is completely normal—and essential to the process.
- A Natural “Marinade” Forms on the Surface
- That released moisture mixes with the salt, creating a thin layer of concentrated seasoning directly on the chicken.
- Moisture and Salt Move Back Into the Meat
- As the chicken rests, this salty liquid is reabsorbed into the meat.
- The result: chicken that is seasoned and juicy from the inside, not just on the surface.
- Proteins Change and Retain More Moisture During Cooking
- Salt slightly alters the structure of muscle proteins, allowing them to hold onto more moisture. This helps prevent the chicken from drying out, even when cooked at higher oven temperatures.
Why Dry Brine Works Especially Well for Chicken Breast
Chicken breast is naturally lean and can dry out very easily. Dry brining helps to:
- improve overall juiciness
- create a more even, tender texture
- allow for controlled and reliable cooking
This method is especially well suited for meal prep, as dry-brined chicken stays juicy and pleasant to eat even the next day.
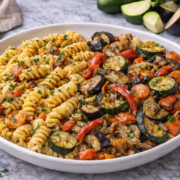
Pasta with Vegetables: Balance Alongside the Cheese Sauce
Why Pasta and Vegetables Matter in a Meal Prep?
In this meal prep, pasta and vegetables are not just fillers. Pasta provides essential carbohydrates, while vegetables add lightness, texture, and freshness. This balance prevents the cheese sauce from becoming overwhelming.
Vegetables help to:
- reduce the overall calorie density of the dish
- balance the richness of the cheese sauce
- make pasta with cheese sauce suitable for everyday meals
This combination works especially well for meal prep, as flavors continue to develop and become more harmonious over the following days.
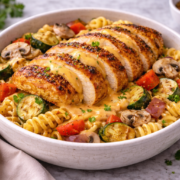
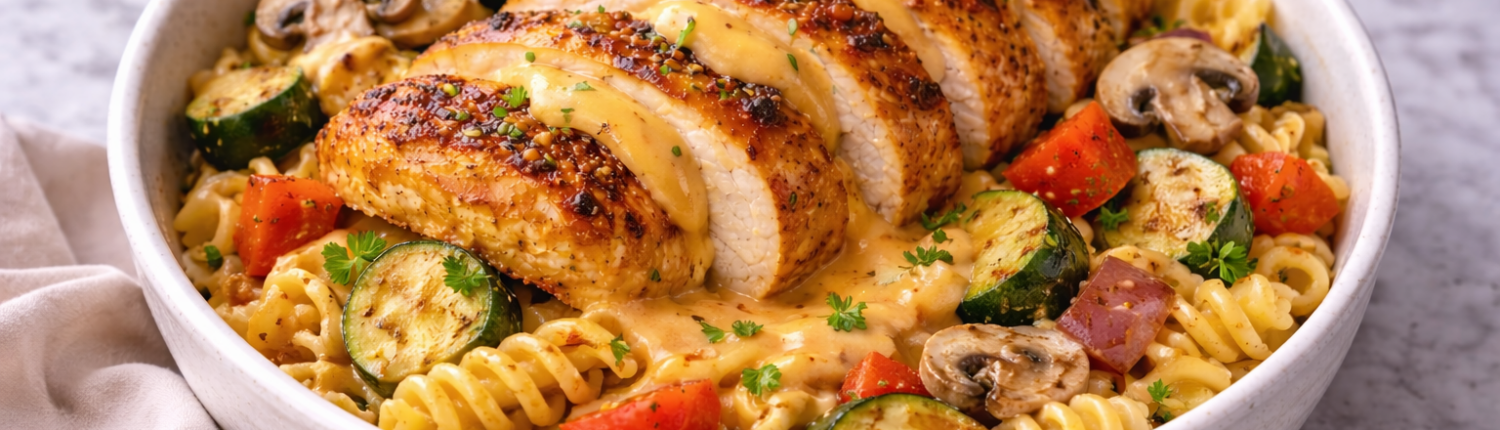
Chicken and Pasta with Cheese Sauce as a Complete Meal Prep Solution
When juicy chicken fillet, cheese sauce, and pasta with vegetables are each thoughtfully prepared, they work together exceptionally well. The cheese sauce ties the dish together, the chicken provides satiety, and the pasta with vegetables creates balance.
This is why this dish is ideal for:
- affordable meal prep
- weekday lunches
- preparing meals several days in advance
Summary: Cheese Sauce Is a Smart Choice for Meal Prep
Cheese sauce does not have to be an occasional “cheat meal.” When prepared intentionally and combined with juicy chicken breast, pasta, and vegetables, it becomes a practical and balanced part of everyday nutrition.
This post lays the foundation for three separate recipes — chicken breast, cheese sauce, and pasta with vegetables — which together form a flavorful and efficient meal prep solution.
Juicy grilled chicken breast
Ingredients
- 2,6 kg chicken fillet
- 20 g salt
- 20 g olive oil
- 3½ tl garlic powder
- 2 tl (white) pepper
- 4 tl dried chilly flakes
- 2 tl dried oregano
- 2 tl smoked paprika powder
Instructions
- Place the chicken breasts into a large bowl.
- In a separate bowl, mix all the dry ingredients together: salt, garlic, white pepper, basil, chili, oregano, and smoked paprika.
- Add the olive oil to the chicken and massage it in until all pieces are evenly coated.
- Next, add the spice mixture and rub the seasonings thoroughly into the chicken, making sure every piece is evenly covered.
- Let the chicken rest at room temperature for 20–30 minutes using the dry brine method, allowing the salt and spices to absorb into the meat.
- Preheat the oven to 200 °C (fan-assisted). I used a 4D hot air setting with a crisp finish—if your oven has a similar option, it works exceptionally well for even cooking and a better surface texture.
- Arrange the chicken on a baking tray so that the thinner ends overlap slightly. This creates a more uniform thickness, helping the chicken cook evenly from end to end and preventing the tips from drying out.
- Roast until the internal temperature reaches 72 °C, using a food thermometer for accuracy. In my oven, this took approximately 35 minutes, but cooking time may vary depending on your oven.
- Remove the chicken from the oven and let it rest for about 15 minutes. During this time, the juices redistribute evenly throughout the meat, and the internal temperature naturally rises to around 75 °C, making the chicken safe to eat.For the juiciest result, chicken is best enjoyed at an internal temperature of 75–78 °C.
Nutrition
Pasta with grilled Italian vegetables
Ingredients
Pasta:
- 1 kg fussili pasta
- ~5 l water
- Salt
Köögiviljad:
- 500 g white onion
- 700 g zukkini
- 500 g eggplant
- 900 g carrot
- 500 g red bell pepper
- 30 g olive oil
- ~10 g fresh rosmary (remove the woody/strong parts)
- ~10 g fresh thyme (remove the woody/strong parts)
- 1,5 tbl dried oregano
- 1 tbl dried garlic powder
- Salt/(white) pepper
- If desired, you can also use other vegetables (for example tomatoes, different types of peppers, or mushrooms).
Instructions
Boiling pasta:
- Typical water rule: ~1 liter of water per 100 g of pasta. I personally use 1 liter per 200 g because I don’t have such a large pot.However, keep in mind: the water may cool down too much, which can increase the cooking time; it may become too starchy (if you use the same cooking water for the sauce, that’s actually a good thing); and the pasta may stick together. I recommend using more water and stirring a bit more frequently.
- Salt rule: Add 10–12 g of salt per 1 liter of water. For 5 liters of water = about 50–60 g of salt. The result should be water that tastes like the sea, so the pasta gets seasoned from the inside as well.
- Pasta cooking rule: always cook the pasta according to the package instructions. For meal prep, cook it 1–2 minutes less so it stays slightly al dente (a bit firmer). Firmer pasta is also healthier, as Your body digests it more slowly, which helps prevent rapid blood sugar spikes — so always aim for al dente.
- Draining: always drain the pasta immediately and serve it right away, or if needed, cool it quickly with cold water and drain it again immediately. If possible, spread the pasta out in a larger GN tray or container so it can cool down evenly.PS! Pasta and other starchy foods (such as rice or potatoes) that have been cooled for at least ~12 hours undergo a structural change in their starch. Part of the starch turns into resistant starch, which digests more slowly and partially acts like fiber. Cooling can be done either in the refrigerator or in the freezer.
Grilled vegetables:
- Chop evenly. Cut everything into pieces of similar size. Harder vegetables (e.g., carrots) slightly smaller. Softer ones (zucchini, peppers) slightly larger. This way everything cooks evenly.
- Add oil moderately. About 10–15 ml of oil per 1 kg. For 3 kg, 30–40 ml. The vegetables should have a light sheen, but not be swimming in oil.
- Season with salt in balance. Add less at first — you can always add more later if needed. Focus on highlighting the natural flavors of the vegetables.
- To bring in more Italian flavor, remove the tough woody stems from the center of the rosemary and thyme, then chop them finely. Add dried oregano, garlic powder, and white pepper for seasoning (it doesn’t stand out visually in the dish — but you can also use black pepper).
- Spread in a single layer. Do not overcrowd the pan or baking tray. The vegetables must be in one layer. Use multiple trays if necessary. Otherwise, they will start steaming instead of roasting.
- Roast at a high temperature. 200–220°C (if possible, use the oven’s crisp or grill function). About 25–35 minutes. Stir 1–2 times during cooking. High heat gives better caramelization and deeper flavor.
Healthy and High-Protein Cheese Sauce
Ingredients
- 20 g olive oil
- 50 g butter
- 200 g onion
- 20 g fresh garlic
- 2 tsp tomato paste
- 2 tsp stock concentrate (I use Maggi chicken stock concentrate)
- 75 g all-purpose flour
- 400 g High-Protein cottage cheese (used the one from Lidl)
- 500 g light greated cheese (16% of fat)
- 200 g light cream cheese
- 450 ml pasta cooking water
Seasoning:
- 1 tbsp smoked paprika
- 1 tsp smoked paprika
- 1 tbsp dried chilly flakes
- 1 tsp ground (white) pepper
- 1 tsp salt (add more at the end if needed)
Instructions
- Measure all the seasonings into a small bowl beforehand so they are easy to grab later.
- Peel and finely chop the onion and garlic.
- Add olive oil and butter to a pan over medium heat.
- Add the chopped onion and garlic to the pan and sauté until the onion becomes translucent and fragrant. Add the seasonings and briefly toast them in the pan.
- Meanwhile, add the following to a blender: cottage cheese, cream cheese, grated cheese and pasta cooking water. (If you don’t have pasta cooking water, you can use boiled and cooled water instead, but pasta cooking water gives a better result.) Blend the mixture until smooth and creamy.
- Add the tomato paste and stock concentrate to the pan and cook for about 1 minute to allow the flavours to develop.
- Add the flour to the pan and cook it for about 2–3 minutes, stirring constantly, until the raw flour taste disappears and the mixture turns lightly golden.
- Then remove the pan from the heat for a moment and pour the blended cheese mixture into the pan. Stir well.
- Return the pan to low heat and cook the sauce, stirring continuously, until the cheese has fully melted and the sauce has thickened.
- For an even silkier texture, ideally blend the sauce once more. If needed, add a little more pasta cooking water to reach your desired consistency.
- Taste the sauce at the end and add more salt or seasonings if needed. Serve hot, as the sauce will thicken as it cools.
Nutrition